
2013年12月29日日曜日
ファイルの読み込み
Qt でファイルを読み込む。
読み込むファイルの準備:ビルドディレクトリの中に data.txt を作成する。
実行結果:
D:\qt\build-qtTest-Desktop_Qt_5_1_1_MinGW_32bit-Debug\debug\qtTest.exe を起動中...
0 : "abcdefg"
1 : "あいうえお"
2 : "12345"
3 : "12345"
全文読み込み:
実行結果:
D:\qt\build-qtTest-Desktop_Qt_5_1_1_MinGW_32bit-Debug\debug\qtTest.exe を起動中...
"abcdefg
あいうえお
12345
12345
読み込むファイルの準備:ビルドディレクトリの中に data.txt を作成する。
実行結果:
D:\qt\build-qtTest-Desktop_Qt_5_1_1_MinGW_32bit-Debug\debug\qtTest.exe を起動中...
0 : "abcdefg"
1 : "あいうえお"
2 : "12345"
3 : "12345"
全文読み込み:
実行結果:
D:\qt\build-qtTest-Desktop_Qt_5_1_1_MinGW_32bit-Debug\debug\qtTest.exe を起動中...
"abcdefg
あいうえお
12345
12345
Combo Box の使い方
デザイン画面からCombo Box を window に追加する。
Combo Box をダブルクリックして、アイテムを追加する。

アイテムがクリックされた時の処理

mainwindow.h の slots に void on_comboBox_currentIndexChanged(const QString &arg1); がとうろくされて、
mainwindow.cpp に
void MainWindow::on_comboBox_currentIndexChanged(const QString &arg1) {..} が作成されているので、クリックされた時の処理を書く。
実行結果:

ソースコード:
ソースコードからCombo Box を追加してみる。
ソースコードでコンボボックスを作成する。
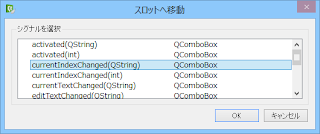
スロットを追加する。 右クリックからリフレクターを選択して、mainwindow.cpp に定義を選択すると、自動で作ってくれる。

Combo Box をダブルクリックして、アイテムを追加する。

アイテムがクリックされた時の処理


mainwindow.h の slots に void on_comboBox_currentIndexChanged(const QString &arg1); がとうろくされて、
mainwindow.cpp に
void MainWindow::on_comboBox_currentIndexChanged(const QString &arg1) {..} が作成されているので、クリックされた時の処理を書く。
実行結果:

ソースコード:
ソースコードからCombo Box を追加してみる。
ソースコードでコンボボックスを作成する。
スロットを追加する。 右クリックからリフレクターを選択して、mainwindow.cpp に定義を選択すると、自動で作ってくれる。

ボタンがクリックされた時の処理
フォームでボタンを追加して、右クリックから、スロットへ移動をを選択する。

mainwindow.cpp に void MainWindow::on_pushButton_clicked(){..} が作成されている。

mainwindow.cpp に void MainWindow::on_pushButton_clicked(){..} が作成されている。


2013年12月16日月曜日
2013年12月14日土曜日
Basic Tutorial 5 をやってみる
キーボードやマウスでの操作方法のようです。
/*
-----------------------------------------------------------------------------
Filename:    TutorialApplication.cpp
-----------------------------------------------------------------------------

This source file is part of the
   ___                 __    __ _ _    _
  /___\__ _ _ __ ___  / / /\ \ (_) | _(_)
 //  // _` | '__/ _ \ \ \/  \/ / | |/ / |
/ \_// (_| | | |  __/  \  /\  /| |   <| |
\___/ \__, |_|  \___|   \/  \/ |_|_|\_\_|
      |___/
      Tutorial Framework
      http://www.ogre3d.org/tikiwiki/
-----------------------------------------------------------------------------
*/
#include "TutorialApplication.h"

//-------------------------------------------------------------------------------------
TutorialApplication::TutorialApplication(void)
{
}
//-------------------------------------------------------------------------------------
TutorialApplication::~TutorialApplication(void)
{
}

//-------------------------------------------------------------------------------------
void TutorialApplication::createScene(void)
{
 mSceneMgr->setAmbientLight(Ogre::ColourValue(0.25, 0.25, 0.25));

 // add the ninja
 Ogre::Entity *ent = mSceneMgr->createEntity("Ninja", "ninja.mesh");
 Ogre::SceneNode *node = mSceneMgr->getRootSceneNode()->createChildSceneNode("NinjaNode");
 node->attachObject(ent);

 // create the light
 Ogre::Light *light = mSceneMgr->createLight("Light1");
 light->setType(Ogre::Light::LT_POINT);
 light->setPosition(Ogre::Vector3(250, 150, 250));
 light->setDiffuseColour(Ogre::ColourValue::White);
 light->setSpecularColour(Ogre::ColourValue::White);

 // Create the scene node
 node = mSceneMgr->getRootSceneNode()->createChildSceneNode("CamNode1", Ogre::Vector3(-400, 200, 400));

 // Make it look towards the ninja
 node->yaw(Ogre::Degree(-45));

 // Create the pitch node
 node = node->createChildSceneNode("PitchNode1");
 node->attachObject(mCamera);

 // create the second camera node/pitch node
 node = mSceneMgr->getRootSceneNode()->createChildSceneNode("CamNode2", Ogre::Vector3(0, 200, 400));
 node = node->createChildSceneNode("PitchNode2");
}
// BaseApplicationからcreateFrameListenerメソッドを呼び出し、変数の一部をが初期化
void TutorialApplication::createFrameListener(void){
 BaseApplication::createFrameListener();

 // カメラコンテナを設定 // Populate the camera container
 mCamNode = mCamera->getParentSceneNode();

 // 回転と移動速度を設定 // set the rotation and move speed
 mRotate = 0.13;
 mMove = 250;

 mDirection = Ogre::Vector3::ZERO;//初期化

}
// キーボードとマウスに応答する為のコード
bool TutorialApplication::frameRenderingQueued(const Ogre::FrameEvent& evt){
 if(mWindow->isClosed())
  return false;

 if(mShutDown)   // エスケープキーが押された
  return false;

 //Need to capture/update each device
 mKeyboard->capture();  // キーボードの状態を捕捉
 mMouse->capture();

 mTrayMgr->frameRenderingQueued(evt);
 mCamNode->translate(mDirection * evt.timeSinceLastFrame, Ogre::Node::TS_LOCAL);//キー入力で値が変更された事を知らせる
 return true;}


// OIS::KeyListener
bool TutorialApplication::keyPressed( const OIS::KeyEvent &arg ){
 switch (arg.key)
 {
 case OIS::KC_1:  // キーボードの1でカメラ切り替え
  mCamera->getParentSceneNode()->detachObject(mCamera);
  mCamNode = mSceneMgr->getSceneNode("CamNode1");
  mCamNode->attachObject(mCamera);
  break;

 case OIS::KC_2:  // キーボードの2でカメラ切り替え
  mCamera->getParentSceneNode()->detachObject(mCamera);
  mCamNode = mSceneMgr->getSceneNode("CamNode2");
  mCamNode->attachObject(mCamera);
  break;
 case OIS::KC_UP:   // Page UP でカメラを上に移動 忍者は下に見える
 case OIS::KC_W:
  mDirection.z = -mMove; // Wキーで忍者を移動
  break;

 case OIS::KC_DOWN:   // Page Down でカメラを下に移動 忍者は上に見える
 case OIS::KC_S:
  mDirection.z = mMove; // Sキーで忍者を移動
  break;

 case OIS::KC_LEFT:   // 左矢印 カメラを左に移動
 case OIS::KC_A:
  mDirection.x = -mMove; // Aキーで忍者を移動
  break;

 case OIS::KC_RIGHT:   // 右矢印 カメラを右に移動
 case OIS::KC_D:
  mDirection.x = mMove; // Dキーで忍者を移動
  break;

 case OIS::KC_PGDOWN:  // Page Down でカメラを下に移動
 case OIS::KC_E:
  mDirection.y = -mMove; // Eキーで忍者を移動
  break;

 case OIS::KC_PGUP:
 case OIS::KC_Q:
  mDirection.y = mMove; // Qキーで忍者を移動
  break;

 case OIS::KC_ESCAPE:  // エスケープキーで終了
  mShutDown = true;
  break;
 default:
  break;
 }
 return true;
}

// キーボードでの移動を停止するたびにmDirectionを元に戻す必要がある
bool TutorialApplication::keyReleased( const OIS::KeyEvent &arg ){

 switch (arg.key)
 {
 case OIS::KC_UP:
 case OIS::KC_W:
  mDirection.z = 0;
  break;

 case OIS::KC_DOWN:
 case OIS::KC_S:
  mDirection.z = 0;
  break;

 case OIS::KC_LEFT:
 case OIS::KC_A:
  mDirection.x = 0;
  break;

 case OIS::KC_RIGHT:
 case OIS::KC_D:
  mDirection.x = 0;
  break;

 case OIS::KC_PGDOWN:
 case OIS::KC_E:
  mDirection.y = 0;
  break;

 case OIS::KC_PGUP:
 case OIS::KC_Q:
  mDirection.y = 0;
  break;

 default:
  break;
 }
 return true;
}

// OIS::MouseListener
bool TutorialApplication::mouseMoved( const OIS::MouseEvent &arg ){
 // マウスの右ボタンでのドラッグでカメラはフリールックモードで動作
 if (arg.state.buttonDown(OIS::MB_Right))
 {
  mCamNode->yaw(Ogre::Degree(-mRotate * arg.state.X.rel), Ogre::Node::TS_WORLD);
  mCamNode->pitch(Ogre::Degree(-mRotate * arg.state.Y.rel), Ogre::Node::TS_LOCAL);
 }
 return true;
}
// マウスの左クリックでライトの切り替え
bool TutorialApplication::mousePressed( const OIS::MouseEvent &arg, OIS::MouseButtonID id ){
 Ogre::Light *light = mSceneMgr->getLight("Light1");
 switch (id)
 {
 case OIS::MB_Left:
  light->setVisible(! light->isVisible());
  break;
 default:
  break;
 }
 return true;
}

//-------------------------------------------------------------------------------------


bool TutorialApplication::mouseReleased( const OIS::MouseEvent &arg, OIS::MouseButtonID id ){return true;}

#if OGRE_PLATFORM == OGRE_PLATFORM_WIN32
#define WIN32_LEAN_AND_MEAN
#include "windows.h"
#endif

#ifdef __cplusplus
extern "C" {
#endif

#if OGRE_PLATFORM == OGRE_PLATFORM_WIN32
 INT WINAPI WinMain( HINSTANCE hInst, HINSTANCE, LPSTR strCmdLine, INT )
#else
 int main(int argc, char *argv[])
#endif
 {
  // Create application object
  TutorialApplication app;

  try {
   app.go();
  } catch( Ogre::Exception& e ) {
#if OGRE_PLATFORM == OGRE_PLATFORM_WIN32
   MessageBox( NULL, e.getFullDescription().c_str(), "An exception has occured!", MB_OK | MB_ICONERROR | MB_TASKMODAL);
#else
   std::cerr << "An exception has occured: " <<
    e.getFullDescription().c_str() << std::endl;
#endif
  }

  return 0;
 }

#ifdef __cplusplus
}
#endif
Basic Tutorial 4 をやってみる
Basic Tutorial 4 は要約するとマウスボタンやキーボードの操作を受け取って、
カメラの位置を変える方法のような気がします。
カメラの位置を変える方法のような気がします。
/*
-----------------------------------------------------------------------------
Filename:    TutorialApplication.cpp
-----------------------------------------------------------------------------

This source file is part of the
   ___                 __    __ _ _    _
  /___\__ _ _ __ ___  / / /\ \ (_) | _(_)
 //  // _` | '__/ _ \ \ \/  \/ / | |/ / |
/ \_// (_| | | |  __/  \  /\  /| |   <| |
\___/ \__, |_|  \___|   \/  \/ |_|_|\_\_|
      |___/
      Tutorial Framework
      http://www.ogre3d.org/tikiwiki/
-----------------------------------------------------------------------------
*/
#include "TutorialApplication.h"

//-------------------------------------------------------------------------------------
TutorialApplication::TutorialApplication(void)
{
}
//-------------------------------------------------------------------------------------
TutorialApplication::~TutorialApplication(void)
{
}

//-------------------------------------------------------------------------------------
void TutorialApplication::createScene(void)
{
 // create your scene here :)

 mSceneMgr->setAmbientLight(Ogre::ColourValue(0.25, 0.25, 0.25));

 Ogre::Entity* ninjaEntity = mSceneMgr->createEntity("Ninja", "ninja.mesh");
 Ogre::SceneNode *node = mSceneMgr->getRootSceneNode()->createChildSceneNode("NinjaNode");
 node->attachObject(ninjaEntity);

 Ogre::Light* pointLight = mSceneMgr->createLight("pointLight");
 pointLight->setType(Ogre::Light::LT_POINT);
 pointLight->setPosition(Ogre::Vector3(0, 0, 0));
 pointLight->setDiffuseColour(Ogre::ColourValue::White);
 pointLight->setSpecularColour(Ogre::ColourValue::White);

}

//-------------------------------------------------------------------------------------
bool TutorialApplication::processUnbufferedInput(const Ogre::FrameEvent& evt)
{

 static bool mMouseDown = false;     // マウスボタンが押された時 // If a mouse button is depressed
 static Ogre::Real mToggle = 0.0;    // 次のトグルまでの時間 // The time left until next toggle
 static Ogre::Real mRotate = 0.13;   // 回転定数 // The rotate constant
 static Ogre::Real mMove = 250;      // 移動定数 // The movement constant

 // 左クリックでライトの点灯消灯切り替え
 bool currMouse = mMouse->getMouseState().buttonDown(OIS::MB_Left);

 if (currMouse && ! mMouseDown)
 {
  Ogre::Light* light = mSceneMgr->getLight("pointLight");
  light->setVisible(! light->isVisible());
 }

 mMouseDown = currMouse; // マウスの状態を設定

 // キーボードの1でライトの切り替え 0.5以上の間隔
 mToggle -= evt.timeSinceLastFrame;

 if ((mToggle < 0.0f ) && mKeyboard->isKeyDown(OIS::KC_1))
 {
  mToggle  = 0.5;
  Ogre::Light* light = mSceneMgr->getLight("pointLight");
  light->setVisible(! light->isVisible());
 }

 // カメラの位置
 Ogre::Vector3 transVector = Ogre::Vector3::ZERO;

 if (mKeyboard->isKeyDown(OIS::KC_I)) // Forward
 {
  transVector.z -= mMove;    // Z軸の移動 マイナス方向 小さくなる
 }
 if (mKeyboard->isKeyDown(OIS::KC_K)) // Backward
 {
  transVector.z += mMove;    // Z軸の移動 プラス方向 小さくなる
 }

 if (mKeyboard->isKeyDown(OIS::KC_J)) // Left - yaw or strafe
 {
  if(mKeyboard->isKeyDown( OIS::KC_LSHIFT ))
  {
   // Yaw left // J + 左シフト 忍者が左回転
   mSceneMgr->getSceneNode("NinjaNode")->yaw(Ogre::Degree(mRotate * 5));
  } else {
   transVector.x -= mMove; // Strafe left // 忍者が左に移動
  }
 }

 if (mKeyboard->isKeyDown(OIS::KC_L)) // Right - yaw or strafe
 {
  if(mKeyboard->isKeyDown( OIS::KC_LSHIFT ))
  {
   // Yaw right // L + 左シフト 忍者が右回転
   mSceneMgr->getSceneNode("NinjaNode")->yaw(Ogre::Degree(-mRotate * 5));
  } else {
   transVector.x += mMove; // Strafe right // 忍者が右に移動
  }
 }

 if (mKeyboard->isKeyDown(OIS::KC_U)) // Up
 {
  transVector.y += mMove;    // 忍者が上に移動
 }
 if (mKeyboard->isKeyDown(OIS::KC_O)) // Down
 {
  transVector.y -= mMove;    // 忍者が下に移動
 }

 //
 mSceneMgr->getSceneNode("NinjaNode")->translate(transVector * evt.timeSinceLastFrame, Ogre::Node::TS_LOCAL);


 return true;
}
//-------------------------------------------------------------------------------------
bool TutorialApplication::frameRenderingQueued(const Ogre::FrameEvent& evt)
{
 bool ret = BaseApplication::frameRenderingQueued(evt);

 if(!processUnbufferedInput(evt)) return false;

 return ret;
}
//-------------------------------------------------------------------------------------

#if OGRE_PLATFORM == OGRE_PLATFORM_WIN32
#define WIN32_LEAN_AND_MEAN
#include "windows.h"
#endif

#ifdef __cplusplus
extern "C" {
#endif

#if OGRE_PLATFORM == OGRE_PLATFORM_WIN32
 INT WINAPI WinMain( HINSTANCE hInst, HINSTANCE, LPSTR strCmdLine, INT )
#else
 int main(int argc, char *argv[])
#endif
 {
  // Create application object
  TutorialApplication app;

  try {
   app.go();
  } catch( Ogre::Exception& e ) {
#if OGRE_PLATFORM == OGRE_PLATFORM_WIN32
   MessageBox( NULL, e.getFullDescription().c_str(), "An exception has occured!", MB_OK | MB_ICONERROR | MB_TASKMODAL);
#else
   std::cerr << "An exception has occured: " <<
    e.getFullDescription().c_str() << std::endl;
#endif
  }

  return 0;
 }

#ifdef __cplusplus
}
#endif
2013年12月12日木曜日
Basic Tutorial 3 をやってみる
Basic Tutorial 3 は地形、空、霧
まずは地形から
とりあえず最初のビルド出来る状態までやってみる。

次に
地形生成インジケータ
地形の保存
クリーンアップ
を行う事で、アプリを向上出来るようです。
次は空
void TutorialApplication::createScene(void){..}の末尾に次の行を追加する。
 中断...
中断...
まずは地形から
とりあえず最初のビルド出来る状態までやってみる。
/*
-----------------------------------------------------------------------------
Filename:    TutorialApplication.h
-----------------------------------------------------------------------------

This source file is part of the
   ___                 __    __ _ _    _
  /___\__ _ _ __ ___  / / /\ \ (_) | _(_)
 //  // _` | '__/ _ \ \ \/  \/ / | |/ / |
/ \_// (_| | | |  __/  \  /\  /| |   <| |
\___/ \__, |_|  \___|   \/  \/ |_|_|\_\_|
      |___/
      Tutorial Framework
      http://www.ogre3d.org/tikiwiki/
-----------------------------------------------------------------------------
*/
#ifndef __TutorialApplication_h_
#define __TutorialApplication_h_

#include
#include
#include "BaseApplication.h"

class TutorialApplication : public BaseApplication
{
public:
 TutorialApplication(void);
 virtual ~TutorialApplication(void);

protected:
 virtual void createScene(void);
 virtual void createFrameListener(void);
 virtual void destroyScene(void);
 virtual bool frameRenderingQueued(const Ogre::FrameEvent& evt);

private:
 Ogre::TerrainGlobalOptions* mTerrainGlobals;
 Ogre::TerrainGroup* mTerrainGroup;
 bool mTerrainsImported;

 void defineTerrain(long x, long y);
 void initBlendMaps(Ogre::Terrain* terrain);
 void configureTerrainDefaults(Ogre::Light* light);
};

#endif // #ifndef __TutorialApplication_h_
/*
-----------------------------------------------------------------------------
Filename:    TutorialApplication.cpp
-----------------------------------------------------------------------------

This source file is part of the
   ___                 __    __ _ _    _
  /___\__ _ _ __ ___  / / /\ \ (_) | _(_)
 //  // _` | '__/ _ \ \ \/  \/ / | |/ / |
/ \_// (_| | | |  __/  \  /\  /| |   <| |
\___/ \__, |_|  \___|   \/  \/ |_|_|\_\_|
      |___/
      Tutorial Framework
      http://www.ogre3d.org/tikiwiki/
-----------------------------------------------------------------------------
*/
#include "TutorialApplication.h"

//-------------------------------------------------------------------------------------
TutorialApplication::TutorialApplication(void)
{
}
//-------------------------------------------------------------------------------------
TutorialApplication::~TutorialApplication(void)
{
}

//-------------------------------------------------------------------------------------
void TutorialApplication::destroyScene(void)
{

}
//-------------------------------------------------------------------------------------
void getTerrainImage(bool flipX, bool flipY, Ogre::Image& img)
{
 img.load("terrain.png", Ogre::ResourceGroupManager::DEFAULT_RESOURCE_GROUP_NAME);
 if (flipX)
  img.flipAroundY();
 if (flipY)
  img.flipAroundX();
}
//-------------------------------------------------------------------------------------
void TutorialApplication::defineTerrain(long x, long y)
{
 Ogre::String filename = mTerrainGroup->generateFilename(x, y);
 if (Ogre::ResourceGroupManager::getSingleton().resourceExists(mTerrainGroup->getResourceGroup(), filename))
 {
  mTerrainGroup->defineTerrain(x, y);
 }
 else
 {
  Ogre::Image img;
  getTerrainImage(x % 2 != 0, y % 2 != 0, img);
  mTerrainGroup->defineTerrain(x, y, &img);
  mTerrainsImported = true;
 }
}
//-------------------------------------------------------------------------------------
void TutorialApplication::initBlendMaps(Ogre::Terrain* terrain)
{
 Ogre::TerrainLayerBlendMap* blendMap0 = terrain->getLayerBlendMap(1);
 Ogre::TerrainLayerBlendMap* blendMap1 = terrain->getLayerBlendMap(2);
 Ogre::Real minHeight0 = 70;
 Ogre::Real fadeDist0 = 40;
 Ogre::Real minHeight1 = 70;
 Ogre::Real fadeDist1 = 15;
 float* pBlend0 = blendMap0->getBlendPointer();
 float* pBlend1 = blendMap1->getBlendPointer();
 for (Ogre::uint16 y = 0; y < terrain->getLayerBlendMapSize(); ++y)
 {
  for (Ogre::uint16 x = 0; x < terrain->getLayerBlendMapSize(); ++x)
  {
   Ogre::Real tx, ty;

   blendMap0->convertImageToTerrainSpace(x, y, &tx, &ty);
   Ogre::Real height = terrain->getHeightAtTerrainPosition(tx, ty);
   Ogre::Real val = (height - minHeight0) / fadeDist0;
   val = Ogre::Math::Clamp(val, (Ogre::Real)0, (Ogre::Real)1);
   *pBlend0++ = val;

   val = (height - minHeight1) / fadeDist1;
   val = Ogre::Math::Clamp(val, (Ogre::Real)0, (Ogre::Real)1);
   *pBlend1++ = val;
  }
 }
 blendMap0->dirty();
 blendMap1->dirty();
 blendMap0->update();
 blendMap1->update();
}
//-------------------------------------------------------------------------------------
void TutorialApplication::configureTerrainDefaults(Ogre::Light* light)
{
 // Configure global
 mTerrainGlobals->setMaxPixelError(8);
 // testing composite map
 mTerrainGlobals->setCompositeMapDistance(3000);

 // Important to set these so that the terrain knows what to use for derived (non-realtime) data
 mTerrainGlobals->setLightMapDirection(light->getDerivedDirection());
 mTerrainGlobals->setCompositeMapAmbient(mSceneMgr->getAmbientLight());
 mTerrainGlobals->setCompositeMapDiffuse(light->getDiffuseColour());

 // Configure default import settings for if we use imported image
 Ogre::Terrain::ImportData& defaultimp = mTerrainGroup->getDefaultImportSettings();
 defaultimp.terrainSize = 513;
 defaultimp.worldSize = 12000.0f;
 defaultimp.inputScale = 600;
 defaultimp.minBatchSize = 33;
 defaultimp.maxBatchSize = 65;
 // textures
 defaultimp.layerList.resize(3);
 defaultimp.layerList[0].worldSize = 100;
 defaultimp.layerList[0].textureNames.push_back("dirt_grayrocky_diffusespecular.dds");
 defaultimp.layerList[0].textureNames.push_back("dirt_grayrocky_normalheight.dds");
 defaultimp.layerList[1].worldSize = 30;
 defaultimp.layerList[1].textureNames.push_back("grass_green-01_diffusespecular.dds");
 defaultimp.layerList[1].textureNames.push_back("grass_green-01_normalheight.dds");
 defaultimp.layerList[2].worldSize = 200;
 defaultimp.layerList[2].textureNames.push_back("growth_weirdfungus-03_diffusespecular.dds");
 defaultimp.layerList[2].textureNames.push_back("growth_weirdfungus-03_normalheight.dds");

}

//-------------------------------------------------------------------------------------
void TutorialApplication::createScene(void)
{
 // create your scene here :)
 mCamera->setPosition(Ogre::Vector3(1683, 50, 2116));
 mCamera->lookAt(Ogre::Vector3(1963, 50, 1660));
 mCamera->setNearClipDistance(0.1);
 mCamera->setFarClipDistance(50000);

 if (mRoot->getRenderSystem()->getCapabilities()->hasCapability(Ogre::RSC_INFINITE_FAR_PLANE))
 {
  mCamera->setFarClipDistance(0);   // enable infinite far clip distance if we can
 }

 Ogre::MaterialManager::getSingleton().setDefaultTextureFiltering(Ogre::TFO_ANISOTROPIC);
 Ogre::MaterialManager::getSingleton().setDefaultAnisotropy(7);

 Ogre::Vector3 lightdir(0.55, -0.3, 0.75);
 lightdir.normalise();

 Ogre::Light* light = mSceneMgr->createLight("tstLight");
 light->setType(Ogre::Light::LT_DIRECTIONAL);
 light->setDirection(lightdir);
 light->setDiffuseColour(Ogre::ColourValue::White);
 light->setSpecularColour(Ogre::ColourValue(0.4, 0.4, 0.4));

 mSceneMgr->setAmbientLight(Ogre::ColourValue(0.2, 0.2, 0.2));

 mTerrainGlobals = OGRE_NEW Ogre::TerrainGlobalOptions();

 mTerrainGroup = OGRE_NEW Ogre::TerrainGroup(mSceneMgr, Ogre::Terrain::ALIGN_X_Z, 513, 12000.0f);
 mTerrainGroup->setFilenameConvention(Ogre::String("BasicTutorial3Terrain"), Ogre::String("dat"));
 mTerrainGroup->setOrigin(Ogre::Vector3::ZERO);

 configureTerrainDefaults(light);

 for (long x = 0; x <= 0; ++x)
  for (long y = 0; y <= 0; ++y)
   defineTerrain(x, y);

 // sync load since we want everything in place when we start
 mTerrainGroup->loadAllTerrains(true);

 if (mTerrainsImported)
 {
  Ogre::TerrainGroup::TerrainIterator ti = mTerrainGroup->getTerrainIterator();
  while(ti.hasMoreElements())
  {
   Ogre::Terrain* t = ti.getNext()->instance;
   initBlendMaps(t);
  }
 }

 mTerrainGroup->freeTemporaryResources();
}

//-------------------------------------------------------------------------------------
void TutorialApplication::createFrameListener(void)
{

}
//-------------------------------------------------------------------------------------
bool TutorialApplication::frameRenderingQueued(const Ogre::FrameEvent& evt)
{
 bool ret = BaseApplication::frameRenderingQueued(evt);
 return ret;
}


#if OGRE_PLATFORM == OGRE_PLATFORM_WIN32
#define WIN32_LEAN_AND_MEAN
#include "windows.h"
#endif

#ifdef __cplusplus
extern "C" {
#endif

#if OGRE_PLATFORM == OGRE_PLATFORM_WIN32
 INT WINAPI WinMain( HINSTANCE hInst, HINSTANCE, LPSTR strCmdLine, INT )
#else
 int main(int argc, char *argv[])
#endif
 {
  // Create application object
  TutorialApplication app;

  try {
   app.go();
  } catch( Ogre::Exception& e ) {
#if OGRE_PLATFORM == OGRE_PLATFORM_WIN32
   MessageBox( NULL, e.getFullDescription().c_str(), "An exception has occured!", MB_OK | MB_ICONERROR | MB_TASKMODAL);
#else
   std::cerr << "An exception has occured: " <<
    e.getFullDescription().c_str() << std::endl;
#endif
  }

  return 0;
 }

#ifdef __cplusplus
}
#endif

次に
地形生成インジケータ
地形の保存
クリーンアップ
を行う事で、アプリを向上出来るようです。
/*
-----------------------------------------------------------------------------
Filename:    TutorialApplication.cpp
-----------------------------------------------------------------------------

This source file is part of the
   ___                 __    __ _ _    _
  /___\__ _ _ __ ___  / / /\ \ (_) | _(_)
 //  // _` | '__/ _ \ \ \/  \/ / | |/ / |
/ \_// (_| | | |  __/  \  /\  /| |   <| |
\___/ \__, |_|  \___|   \/  \/ |_|_|\_\_|
      |___/
      Tutorial Framework
      http://www.ogre3d.org/tikiwiki/
-----------------------------------------------------------------------------
*/
#include "TutorialApplication.h"

//-------------------------------------------------------------------------------------
TutorialApplication::TutorialApplication(void)
{
}
//-------------------------------------------------------------------------------------
TutorialApplication::~TutorialApplication(void)
{
}

//-------------------------------------------------------------------------------------
void TutorialApplication::destroyScene(void)
{
 OGRE_DELETE mTerrainGroup;
 OGRE_DELETE mTerrainGlobals;
}
//-------------------------------------------------------------------------------------
void getTerrainImage(bool flipX, bool flipY, Ogre::Image& img)
{
 img.load("terrain.png", Ogre::ResourceGroupManager::DEFAULT_RESOURCE_GROUP_NAME);
 if (flipX)
  img.flipAroundY();
 if (flipY)
  img.flipAroundX();
}
//-------------------------------------------------------------------------------------
void TutorialApplication::defineTerrain(long x, long y)
{
 Ogre::String filename = mTerrainGroup->generateFilename(x, y);
 if (Ogre::ResourceGroupManager::getSingleton().resourceExists(mTerrainGroup->getResourceGroup(), filename))
 {
  mTerrainGroup->defineTerrain(x, y);
 }
 else
 {
  Ogre::Image img;
  getTerrainImage(x % 2 != 0, y % 2 != 0, img);
  mTerrainGroup->defineTerrain(x, y, &img);
  mTerrainsImported = true;
 }
}
//-------------------------------------------------------------------------------------
void TutorialApplication::initBlendMaps(Ogre::Terrain* terrain)
{
 Ogre::TerrainLayerBlendMap* blendMap0 = terrain->getLayerBlendMap(1);
 Ogre::TerrainLayerBlendMap* blendMap1 = terrain->getLayerBlendMap(2);
 Ogre::Real minHeight0 = 70;
 Ogre::Real fadeDist0 = 40;
 Ogre::Real minHeight1 = 70;
 Ogre::Real fadeDist1 = 15;
 float* pBlend0 = blendMap0->getBlendPointer();
 float* pBlend1 = blendMap1->getBlendPointer();
 for (Ogre::uint16 y = 0; y < terrain->getLayerBlendMapSize(); ++y)
 {
  for (Ogre::uint16 x = 0; x < terrain->getLayerBlendMapSize(); ++x)
  {
   Ogre::Real tx, ty;

   blendMap0->convertImageToTerrainSpace(x, y, &tx, &ty);
   Ogre::Real height = terrain->getHeightAtTerrainPosition(tx, ty);
   Ogre::Real val = (height - minHeight0) / fadeDist0;
   val = Ogre::Math::Clamp(val, (Ogre::Real)0, (Ogre::Real)1);
   *pBlend0++ = val;

   val = (height - minHeight1) / fadeDist1;
   val = Ogre::Math::Clamp(val, (Ogre::Real)0, (Ogre::Real)1);
   *pBlend1++ = val;
  }
 }
 blendMap0->dirty();
 blendMap1->dirty();
 blendMap0->update();
 blendMap1->update();
}
//-------------------------------------------------------------------------------------
void TutorialApplication::configureTerrainDefaults(Ogre::Light* light)
{
 // Configure global
 mTerrainGlobals->setMaxPixelError(8);
 // testing composite map
 mTerrainGlobals->setCompositeMapDistance(3000);

 // Important to set these so that the terrain knows what to use for derived (non-realtime) data
 mTerrainGlobals->setLightMapDirection(light->getDerivedDirection());
 mTerrainGlobals->setCompositeMapAmbient(mSceneMgr->getAmbientLight());
 mTerrainGlobals->setCompositeMapDiffuse(light->getDiffuseColour());

 // Configure default import settings for if we use imported image
 Ogre::Terrain::ImportData& defaultimp = mTerrainGroup->getDefaultImportSettings();
 defaultimp.terrainSize = 513;
 defaultimp.worldSize = 12000.0f;
 defaultimp.inputScale = 600;
 defaultimp.minBatchSize = 33;
 defaultimp.maxBatchSize = 65;
 // textures
 defaultimp.layerList.resize(3);
 defaultimp.layerList[0].worldSize = 100;
 defaultimp.layerList[0].textureNames.push_back("dirt_grayrocky_diffusespecular.dds");
 defaultimp.layerList[0].textureNames.push_back("dirt_grayrocky_normalheight.dds");
 defaultimp.layerList[1].worldSize = 30;
 defaultimp.layerList[1].textureNames.push_back("grass_green-01_diffusespecular.dds");
 defaultimp.layerList[1].textureNames.push_back("grass_green-01_normalheight.dds");
 defaultimp.layerList[2].worldSize = 200;
 defaultimp.layerList[2].textureNames.push_back("growth_weirdfungus-03_diffusespecular.dds");
 defaultimp.layerList[2].textureNames.push_back("growth_weirdfungus-03_normalheight.dds");

}

//-------------------------------------------------------------------------------------
void TutorialApplication::createScene(void)
{
 // create your scene here :)
 mCamera->setPosition(Ogre::Vector3(1683, 50, 2116));
 mCamera->lookAt(Ogre::Vector3(1963, 50, 1660));
 mCamera->setNearClipDistance(0.1);
 mCamera->setFarClipDistance(50000);

 if (mRoot->getRenderSystem()->getCapabilities()->hasCapability(Ogre::RSC_INFINITE_FAR_PLANE))
 {
  mCamera->setFarClipDistance(0);   // enable infinite far clip distance if we can
 }

 Ogre::MaterialManager::getSingleton().setDefaultTextureFiltering(Ogre::TFO_ANISOTROPIC);
 Ogre::MaterialManager::getSingleton().setDefaultAnisotropy(7);

 Ogre::Vector3 lightdir(0.55, -0.3, 0.75);
 lightdir.normalise();

 Ogre::Light* light = mSceneMgr->createLight("tstLight");
 light->setType(Ogre::Light::LT_DIRECTIONAL);
 light->setDirection(lightdir);
 light->setDiffuseColour(Ogre::ColourValue::White);
 light->setSpecularColour(Ogre::ColourValue(0.4, 0.4, 0.4));

 mSceneMgr->setAmbientLight(Ogre::ColourValue(0.2, 0.2, 0.2));

 mTerrainGlobals = OGRE_NEW Ogre::TerrainGlobalOptions();

 mTerrainGroup = OGRE_NEW Ogre::TerrainGroup(mSceneMgr, Ogre::Terrain::ALIGN_X_Z, 513, 12000.0f);
 mTerrainGroup->setFilenameConvention(Ogre::String("BasicTutorial3Terrain"), Ogre::String("dat"));
 mTerrainGroup->setOrigin(Ogre::Vector3::ZERO);

 configureTerrainDefaults(light);

 for (long x = 0; x <= 0; ++x)
  for (long y = 0; y <= 0; ++y)
   defineTerrain(x, y);

 // sync load since we want everything in place when we start
 mTerrainGroup->loadAllTerrains(true);

 if (mTerrainsImported)
 {
  Ogre::TerrainGroup::TerrainIterator ti = mTerrainGroup->getTerrainIterator();
  while(ti.hasMoreElements())
  {
   Ogre::Terrain* t = ti.getNext()->instance;
   initBlendMaps(t);
  }
 }

 mTerrainGroup->freeTemporaryResources();
}

//-------------------------------------------------------------------------------------
void TutorialApplication::createFrameListener(void)
{
 BaseApplication::createFrameListener();

 mInfoLabel = mTrayMgr->createLabel(OgreBites::TL_TOP, "TInfo", "", 350);
}
//-------------------------------------------------------------------------------------
bool TutorialApplication::frameRenderingQueued(const Ogre::FrameEvent& evt)
{
 bool ret = BaseApplication::frameRenderingQueued(evt);

 if (mTerrainGroup->isDerivedDataUpdateInProgress())
 {
  mTrayMgr->moveWidgetToTray(mInfoLabel, OgreBites::TL_TOP, 0);
  mInfoLabel->show();
  if (mTerrainsImported)
  {
   mInfoLabel->setCaption("Building terrain, please wait...");
  }
  else
  {
   mInfoLabel->setCaption("Updating textures, patience...");
  }
 }
 else
 {
  mTrayMgr->removeWidgetFromTray(mInfoLabel);
  mInfoLabel->hide();
  if (mTerrainsImported)
  {
   mTerrainGroup->saveAllTerrains(true);
   mTerrainsImported = false;
  }
 }

 return ret;
}


#if OGRE_PLATFORM == OGRE_PLATFORM_WIN32
#define WIN32_LEAN_AND_MEAN
#include "windows.h"
#endif

#ifdef __cplusplus
extern "C" {
#endif

#if OGRE_PLATFORM == OGRE_PLATFORM_WIN32
 INT WINAPI WinMain( HINSTANCE hInst, HINSTANCE, LPSTR strCmdLine, INT )
#else
 int main(int argc, char *argv[])
#endif
 {
  // Create application object
  TutorialApplication app;

  try {
   app.go();
  } catch( Ogre::Exception& e ) {
#if OGRE_PLATFORM == OGRE_PLATFORM_WIN32
   MessageBox( NULL, e.getFullDescription().c_str(), "An exception has occured!", MB_OK | MB_ICONERROR | MB_TASKMODAL);
#else
   std::cerr << "An exception has occured: " <<
    e.getFullDescription().c_str() << std::endl;
#endif
  }

  return 0;
 }

#ifdef __cplusplus
}
#endif
フレームリスナーを追加して、カメラの移動も可能になった。次は空
void TutorialApplication::createScene(void){..}の末尾に次の行を追加する。
mSceneMgr->setSkyBox(true, "Examples/SpaceSkyBox");

Basic Tutorial 2 をやってみる
Basic Tutorial 2 では、カメラとライト、影の使い方。
前回のソースコードを使う。
TutorialApplication.h
TutorialApplication.cpp

ライトと影

前回のソースコードを使う。
TutorialApplication.h
/*
-----------------------------------------------------------------------------
Filename:    TutorialApplication.h
-----------------------------------------------------------------------------

This source file is part of the
   ___                 __    __ _ _    _
  /___\__ _ _ __ ___  / / /\ \ (_) | _(_)
 //  // _` | '__/ _ \ \ \/  \/ / | |/ / |
/ \_// (_| | | |  __/  \  /\  /| |   <| |
\___/ \__, |_|  \___|   \/  \/ |_|_|\_\_|
      |___/
      Tutorial Framework
      http://www.ogre3d.org/tikiwiki/
-----------------------------------------------------------------------------
*/
#ifndef __TutorialApplication_h_
#define __TutorialApplication_h_

#include "BaseApplication.h"

class TutorialApplication : public BaseApplication
{
public:
    TutorialApplication(void);
    virtual ~TutorialApplication(void);

protected:
    virtual void createScene(void);

 virtual void createCamera(void);
 virtual void createViewports(void);

};

#endif // #ifndef __TutorialApplication_h_
TutorialApplication.cpp
/*
-----------------------------------------------------------------------------
Filename:    TutorialApplication.cpp
-----------------------------------------------------------------------------

This source file is part of the
   ___                 __    __ _ _    _
  /___\__ _ _ __ ___  / / /\ \ (_) | _(_)
 //  // _` | '__/ _ \ \ \/  \/ / | |/ / |
/ \_// (_| | | |  __/  \  /\  /| |   <| |
\___/ \__, |_|  \___|   \/  \/ |_|_|\_\_|
      |___/
      Tutorial Framework
      http://www.ogre3d.org/tikiwiki/
-----------------------------------------------------------------------------
*/
#include "TutorialApplication.h"

//-------------------------------------------------------------------------------------
TutorialApplication::TutorialApplication(void)
{
}
//-------------------------------------------------------------------------------------
TutorialApplication::~TutorialApplication(void)
{
}

//-------------------------------------------------------------------------------------
void TutorialApplication::createScene(void)
{
 // create your scene here :)


 // Set the scene's ambient light
 // シーンに周囲光をセット
    mSceneMgr->setAmbientLight(Ogre::ColourValue(0.5f, 0.5f, 0.5f));

    // Create an Entity
 // エンティティの作成
 Ogre::Entity* ogreHead = mSceneMgr->createEntity("Head", "ogrehead.mesh");

 // Create a SceneNode and attach the Entity to it
 // シーンノードの作成とエンティティのアタッチ
 Ogre::SceneNode* headNode = mSceneMgr->getRootSceneNode()->createChildSceneNode("HeadNode");

    headNode->attachObject(ogreHead);

    // Create a Light and set its position
 // ライトの作成と位置の指定
    Ogre::Light* light = mSceneMgr->createLight("MainLight");
    light->setPosition(20.0f, 80.0f, 50.0f);


}
//-------------------------------------------------------------------------------------
void TutorialApplication::createCamera(void)
{
 // create the camera
 // カメラを作成
 mCamera = mSceneMgr->createCamera("PlayerCam");
 // set its position, direction
 // 位置と方向設定
 mCamera->setPosition(Ogre::Vector3(0,10,500));
 mCamera->lookAt(Ogre::Vector3(0,0,0));
 // set the near clip distance
 // ニアクリッピング距離の設定
 mCamera->setNearClipDistance(5);

 //デフォルトのカメラコントローラの作成
 mCameraMan = new OgreBites::SdkCameraMan(mCamera);   // create a default camera controller
}

//-------------------------------------------------------------------------------------
void TutorialApplication::createViewports(void)
{
 // Create one viewport, entire window
 // 1つのビューポートを作成、ウインドウ全体
 Ogre::Viewport* vp = mWindow->addViewport(mCamera);
 vp->setBackgroundColour(Ogre::ColourValue(0,0,0));//ビューポートの背景:黒
 // Alter the camera aspect ratio to match the viewport
 // ビューポートに一致するように、カメラアスペクト比を変更
 mCamera->setAspectRatio(Ogre::Real(vp->getActualWidth()) / Ogre::Real(vp->getActualHeight()));

}


#if OGRE_PLATFORM == OGRE_PLATFORM_WIN32
#define WIN32_LEAN_AND_MEAN
#include "windows.h"
#endif

#ifdef __cplusplus
extern "C" {
#endif

#if OGRE_PLATFORM == OGRE_PLATFORM_WIN32
    INT WINAPI WinMain( HINSTANCE hInst, HINSTANCE, LPSTR strCmdLine, INT )
#else
    int main(int argc, char *argv[])
#endif
    {
        // Create application object
        TutorialApplication app;

        try {
            app.go();
        } catch( Ogre::Exception& e ) {
#if OGRE_PLATFORM == OGRE_PLATFORM_WIN32
            MessageBox( NULL, e.getFullDescription().c_str(), "An exception has occured!", MB_OK | MB_ICONERROR | MB_TASKMODAL);
#else
            std::cerr << "An exception has occured: " <<
                e.getFullDescription().c_str() << std::endl;
#endif
        }

        return 0;
    }

#ifdef __cplusplus
}
#endif

ライトと影
/*
-----------------------------------------------------------------------------
Filename:    TutorialApplication.cpp
-----------------------------------------------------------------------------

This source file is part of the
___                 __    __ _ _    _
/___\__ _ _ __ ___  / / /\ \ (_) | _(_)
//  // _` | '__/ _ \ \ \/  \/ / | |/ / |
/ \_// (_| | | |  __/  \  /\  /| |   <| |
\___/ \__, |_|  \___|   \/  \/ |_|_|\_\_|
|___/
Tutorial Framework
http://www.ogre3d.org/tikiwiki/
-----------------------------------------------------------------------------
*/
#include "TutorialApplication.h"

//-------------------------------------------------------------------------------------
TutorialApplication::TutorialApplication(void)
{
}
//-------------------------------------------------------------------------------------
TutorialApplication::~TutorialApplication(void)
{
}

//-------------------------------------------------------------------------------------
void TutorialApplication::createScene(void)
{
 // 影
 mSceneMgr->setAmbientLight(Ogre::ColourValue(0, 0, 0));// 周囲光の設定
 mSceneMgr->setShadowTechnique(Ogre::SHADOWTYPE_STENCIL_ADDITIVE);//影の種類を指定

 Ogre::Entity* entNinja = mSceneMgr->createEntity("Ninja", "ninja.mesh");// 忍者オブジェクトを作成
 entNinja->setCastShadows(true);//影を表示させる
 mSceneMgr->getRootSceneNode()->createChildSceneNode()->attachObject(entNinja);// オブジェクトを表示させる

 Ogre::Plane plane(Ogre::Vector3::UNIT_Y, 0);//原点から0の地点にパネルを作成

 // 平面のメッシュと作成して上のパネルを登録
 Ogre::MeshManager::getSingleton().createPlane("ground", Ogre::ResourceGroupManager::DEFAULT_RESOURCE_GROUP_NAME,
  plane, 1500, 1500, 20, 20, true, 1, 5, 5, Ogre::Vector3::UNIT_Z);

 Ogre::Entity* entGround = mSceneMgr->createEntity("GroundEntity", "ground");//パネルのエンティティを作成
 mSceneMgr->getRootSceneNode()->createChildSceneNode()->attachObject(entGround);//スクリーンマネージャーにパネルのエンティティを設定

 entGround->setMaterialName("Examples/Rockwall");// パネルのテクスチャ
 entGround->setCastShadows(false);// パネルの影は表示しない

 //ライト
 Ogre::Light* pointLight = mSceneMgr->createLight("pointLight");//ライトの作成
 pointLight->setType(Ogre::Light::LT_POINT);// ポイントライトに指定
 pointLight->setPosition(Ogre::Vector3(0, 150, 250));// ライトの位置

 pointLight->setDiffuseColour(1.0, 0.0, 0.0);// 拡散反射の色を指定
 pointLight->setSpecularColour(1.0, 0.0, 0.0);// 鏡面反射の色を指定

 Ogre::Light* directionalLight = mSceneMgr->createLight("directionalLight");//二つ目のライトを作成
 directionalLight->setType(Ogre::Light::LT_DIRECTIONAL);// 指向性光源
 directionalLight->setDiffuseColour(Ogre::ColourValue(.25, .25, 0));
 directionalLight->setSpecularColour(Ogre::ColourValue(.25, .25, 0));

 directionalLight->setDirection(Ogre::Vector3( 0, -1, 1 ));// ライトの位置

 Ogre::Light* spotLight = mSceneMgr->createLight("spotLight");//三つ目のライト
 spotLight->setType(Ogre::Light::LT_SPOTLIGHT);//スポットライトに指定
 spotLight->setDiffuseColour(0, 0, 1.0);
 spotLight->setSpecularColour(0, 0, 1.0);

 spotLight->setDirection(-1, -1, 0);
 spotLight->setPosition(Ogre::Vector3(300, 300, 0));

 spotLight->setSpotlightRange(Ogre::Degree(35), Ogre::Degree(50));

}
//-------------------------------------------------------------------------------------
void TutorialApplication::createCamera(void)
{
 // create the camera
 // カメラを作成
 mCamera = mSceneMgr->createCamera("PlayerCam");
 // set its position, direction
 // 位置と方向設定
 mCamera->setPosition(Ogre::Vector3(0,400,500));// 左右,高さ,前後
 mCamera->lookAt(Ogre::Vector3(0,0,0));
 // set the near clip distance
 // ニアクリッピング距離の設定
 mCamera->setNearClipDistance(10);

 //デフォルトのカメラコントローラの作成
 mCameraMan = new OgreBites::SdkCameraMan(mCamera);   // create a default camera controller
}

//-------------------------------------------------------------------------------------
void TutorialApplication::createViewports(void)
{
 // Create one viewport, entire window
 // 1つのビューポートを作成、ウインドウ全体
 Ogre::Viewport* vp = mWindow->addViewport(mCamera);
 vp->setBackgroundColour(Ogre::ColourValue(0,0,0));//ビューポートの背景:黒
 // Alter the camera aspect ratio to match the viewport
 // ビューポートに一致するように、カメラアスペクト比を変更
 mCamera->setAspectRatio(Ogre::Real(vp->getActualWidth()) / Ogre::Real(vp->getActualHeight()));

}


#if OGRE_PLATFORM == OGRE_PLATFORM_WIN32
#define WIN32_LEAN_AND_MEAN
#include "windows.h"
#endif

#ifdef __cplusplus
extern "C" {
#endif

#if OGRE_PLATFORM == OGRE_PLATFORM_WIN32
 INT WINAPI WinMain( HINSTANCE hInst, HINSTANCE, LPSTR strCmdLine, INT )
#else
 int main(int argc, char *argv[])
#endif
 {
  // Create application object
  TutorialApplication app;

  try {
   app.go();
  } catch( Ogre::Exception& e ) {
#if OGRE_PLATFORM == OGRE_PLATFORM_WIN32
   MessageBox( NULL, e.getFullDescription().c_str(), "An exception has occured!", MB_OK | MB_ICONERROR | MB_TASKMODAL);
#else
   std::cerr << "An exception has occured: " <<
    e.getFullDescription().c_str() << std::endl;
#endif
  }

  return 0;
 }

#ifdef __cplusplus
}
#endif

Ogre:Basic Tutorial 1 をやってみる
Tutorial 1 では、スクリーンマネージャーとスクリーンノードとエンティティオブジェクトの簡単な使い方を解説している。
Tutorial 1 では以下の事が確認できる。
1.スクリーンにオブジェクトを表示して、マウスやキーボードでカメラでの移動
2.オブジェクトの追加
オブジェクトを連動して動かす場合と別々に動かす場合
3.オブジェクトの拡大・縮小
4.オブジェクトの回転
TutorialFramework.zipを解凍して、プロジェクトに読み込んで、ソースコードを入力する。
TutorialApplication.cpp の
void TutorialApplication::createScene(void){..}の部分
に書き込む

マウス移動やキーボードの矢印でカメラ位置を変えられる。ESCで終了
オブジェクトの追加
void TutorialApplication::createScene(void){..}の部分の末尾に追加
新しいノードをスクリーンマネージャでルートノードを取得して、ルートの子ノードとして作成。
それぞれ独立して動く。

カメラ位置を引いて確認する。
連動して動かしたい場合
作成したオブジェクトの子として作成する
スケール(縮小・拡大)
親オブジェクトだけ変更してみる

回転

Tutorial 1 では以下の事が確認できる。
1.スクリーンにオブジェクトを表示して、マウスやキーボードでカメラでの移動
2.オブジェクトの追加
オブジェクトを連動して動かす場合と別々に動かす場合
3.オブジェクトの拡大・縮小
4.オブジェクトの回転
TutorialFramework.zipを解凍して、プロジェクトに読み込んで、ソースコードを入力する。
TutorialApplication.cpp の
void TutorialApplication::createScene(void){..}の部分
に書き込む
/*
-----------------------------------------------------------------------------
Filename:    TutorialApplication.cpp
-----------------------------------------------------------------------------

This source file is part of the
   ___                 __    __ _ _    _
  /___\__ _ _ __ ___  / / /\ \ (_) | _(_)
 //  // _` | '__/ _ \ \ \/  \/ / | |/ / |
/ \_// (_| | | |  __/  \  /\  /| |   <| |
\___/ \__, |_|  \___|   \/  \/ |_|_|\_\_|
      |___/
      Tutorial Framework
      http://www.ogre3d.org/tikiwiki/
-----------------------------------------------------------------------------
*/
#include "TutorialApplication.h"

//-------------------------------------------------------------------------------------
TutorialApplication::TutorialApplication(void)
{
}
//-------------------------------------------------------------------------------------
TutorialApplication::~TutorialApplication(void)
{
}

//-------------------------------------------------------------------------------------
void TutorialApplication::createScene(void)
{
 // create your scene here :)


 // Set the scene's ambient light
 // シーンに周囲光をセット
    mSceneMgr->setAmbientLight(Ogre::ColourValue(0.5f, 0.5f, 0.5f));

    // Create an Entity
 // エンティティの作成
    Ogre::Entity* ogreHead = mSceneMgr->createEntity("Head", "ogrehead.mesh");

 // Create a SceneNode and attach the Entity to it
 // シーンノードの作成とエンティティのアタッチ
    Ogre::SceneNode* headNode = mSceneMgr->getRootSceneNode()->createChildSceneNode("HeadNode");

    headNode->attachObject(ogreHead);

    // Create a Light and set its position
 // ライトの作成と位置の指定
    Ogre::Light* light = mSceneMgr->createLight("MainLight");
    light->setPosition(20.0f, 80.0f, 50.0f);

}


#if OGRE_PLATFORM == OGRE_PLATFORM_WIN32
#define WIN32_LEAN_AND_MEAN
#include "windows.h"
#endif

#ifdef __cplusplus
extern "C" {
#endif

#if OGRE_PLATFORM == OGRE_PLATFORM_WIN32
    INT WINAPI WinMain( HINSTANCE hInst, HINSTANCE, LPSTR strCmdLine, INT )
#else
    int main(int argc, char *argv[])
#endif
    {
        // Create application object
        TutorialApplication app;

        try {
            app.go();
        } catch( Ogre::Exception& e ) {
#if OGRE_PLATFORM == OGRE_PLATFORM_WIN32
            MessageBox( NULL, e.getFullDescription().c_str(), "An exception has occured!", MB_OK | MB_ICONERROR | MB_TASKMODAL);
#else
            std::cerr << "An exception has occured: " <<
                e.getFullDescription().c_str() << std::endl;
#endif
        }

        return 0;
    }

#ifdef __cplusplus
}
#endif

マウス移動やキーボードの矢印でカメラ位置を変えられる。ESCで終了
オブジェクトの追加
void TutorialApplication::createScene(void){..}の部分の末尾に追加
 Ogre::Entity* ogreHead2 = mSceneMgr->createEntity( "Head2", "ogrehead.mesh" );
 Ogre::SceneNode* headNode2 = mSceneMgr->getRootSceneNode()->createChildSceneNode( "HeadNode2", Ogre::Vector3( 100, 0, 0 ) );
 headNode2->attachObject( ogreHead2 );
新しいノードをスクリーンマネージャでルートノードを取得して、ルートの子ノードとして作成。
それぞれ独立して動く。

カメラ位置を引いて確認する。
連動して動かしたい場合
作成したオブジェクトの子として作成する
 // オブジェクトの追加
 Ogre::Entity* ogreHead2 = mSceneMgr->createEntity( "Head2", "ogrehead.mesh" );
 Ogre::SceneNode* headNode2 = headNode->createChildSceneNode( "HeadNode2", Ogre::Vector3( 100, 0, 0 ) );
 headNode2->attachObject( ogreHead2 );

 // 親オブジェクトの移動
 headNode->translate( Ogre::Vector3( 0, 25, 0 ) );
親を移動させた場合子も連動して動く。
// 子オブジェクトの移動
 headNode2->translate( Ogre::Vector3( 0, 25, 0 ) );
子だけ移動させた場足は子だけ動く。
スケール(縮小・拡大)
親オブジェクトだけ変更してみる
 // オブジェクトの追加
 Ogre::Entity* ogreHead2 = mSceneMgr->createEntity( "Head2", "ogrehead.mesh" );
 Ogre::SceneNode* headNode2 = mSceneMgr->getRootSceneNode()->createChildSceneNode( "HeadNode2", Ogre::Vector3( 100, 0, 0 ) );
 //Ogre::SceneNode* headNode2 = headNode->createChildSceneNode( "HeadNode2", Ogre::Vector3( 100, 0, 0 ) );
 headNode2->attachObject( ogreHead2 );

 // 親オブジェクトのスケール変更
 headNode->scale( .5, 1, 2 );

回転
 // オブジェクトの追加
 Ogre::Entity* ogreHead2 = mSceneMgr->createEntity( "Head2", "ogrehead.mesh" );
 Ogre::SceneNode* headNode2 = mSceneMgr->getRootSceneNode()->createChildSceneNode( "HeadNode2", Ogre::Vector3( 100, 0, 0 ) );
 //Ogre::SceneNode* headNode2 = headNode->createChildSceneNode( "HeadNode2", Ogre::Vector3( 100, 0, 0 ) );
 headNode2->attachObject( ogreHead2 );

 // 親オブジェクトの回転
 headNode->yaw( Ogre::Degree( -90 ) );

OGREのインストールとサンプルの実行
基本的にOgre のホームページの
Setting Up An Application With Visual Studio
を見て設定。
ダウンロードしたSDK:OgreSDK_vc10_v1-7-4.exe
修正点
$(OGRE_HOME)\boost
を
$(OGRE_HOME)\boost_1_47
に読み替える。
サンプルのダウンロード
チュートリアルページで紹介されている
Ogre Wiki Tutorial Framework をダウンロードする。
Setting Up An Application With Visual Studio
を見て設定。
ダウンロードしたSDK:OgreSDK_vc10_v1-7-4.exe
修正点
$(OGRE_HOME)\boost
を
$(OGRE_HOME)\boost_1_47
に読み替える。
サンプルのダウンロード
チュートリアルページで紹介されている
Ogre Wiki Tutorial Framework をダウンロードする。
ダウンロードしたファイル:TutorialFramework.zip
Visual Studio で空のプロジェクトを作って、サンプルを追加して実行する。
2013年12月9日月曜日
開発環境を整える:OpenGL
MinGW でコンパイルできるようにする。
freeglut-MinGW-2.8.1-1.mp.zipをダウンロードして解凍する。
freeglut フォルダの中の lib フォルダを、MinGW のlib フォルダにコピーする。
freeglut フォルダの中の include フォルダを、MinGW のinclude フォルダにコピーする。
freeglut フォルダの中の bin フォルダの中の freeglut.dll は、
パスが通っているフォルダにコピーすればいいので、MinGW のbin にコピーした。
freeglutのサイトでのコードを実行してみる。
http://www.transmissionzero.co.uk/computing/using-glut-with-mingw/
D:\>g++ opencv.cpp -o opencv.exe -lfreeglut -lglu32 -lopengl32
opencv.exe が出来上がる。
ダブルクリックで実行してみる。

eclipse で開発したい。
すでに、MinGW が使えるのでスタンダードエディションを選ぶ。
日本語プロジェクトのPleiades 32bit C/C++ のpleiades-e4.3-cpp-32bit_20130626.zip
をダウンロードして解凍する。
空の C++ プロジェクトを ツールチェーンは MinGW を選択するして作成する。
ソースコードを追加して、上と同じコードを書き込む。
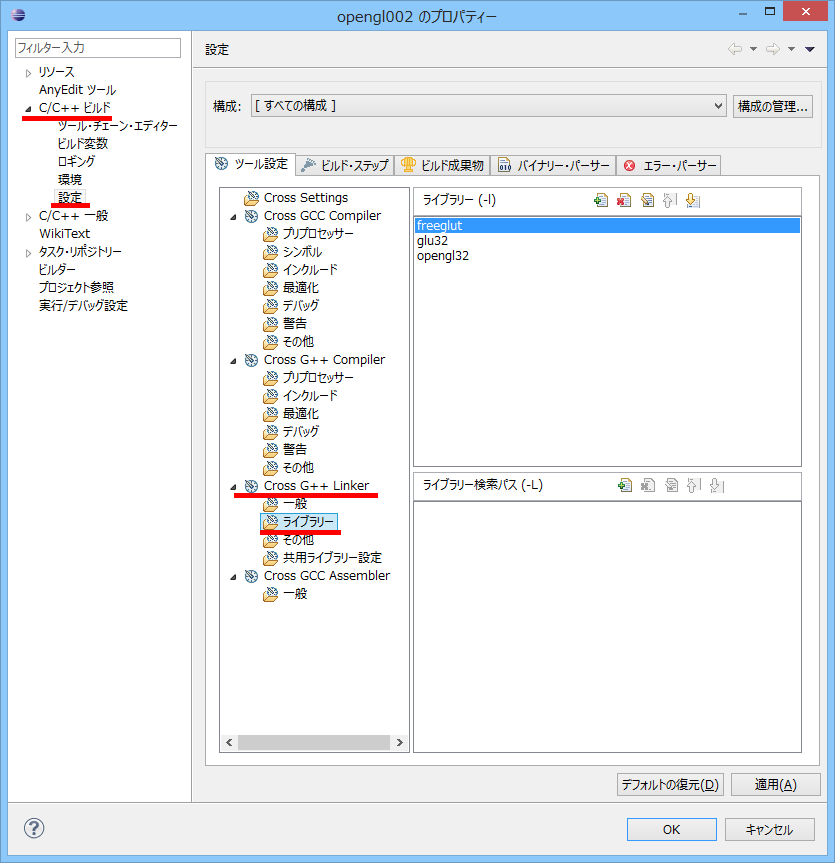
ビルドの設定をする。
リンカを設定する。
freeglut
glu32
opengl32

プロジェクトを右クリックして、構成のビルドから、すべてのビルビルドを選択する。
Debug フォルダが出来て、その中に、プロジェクト名.exe が出来る。
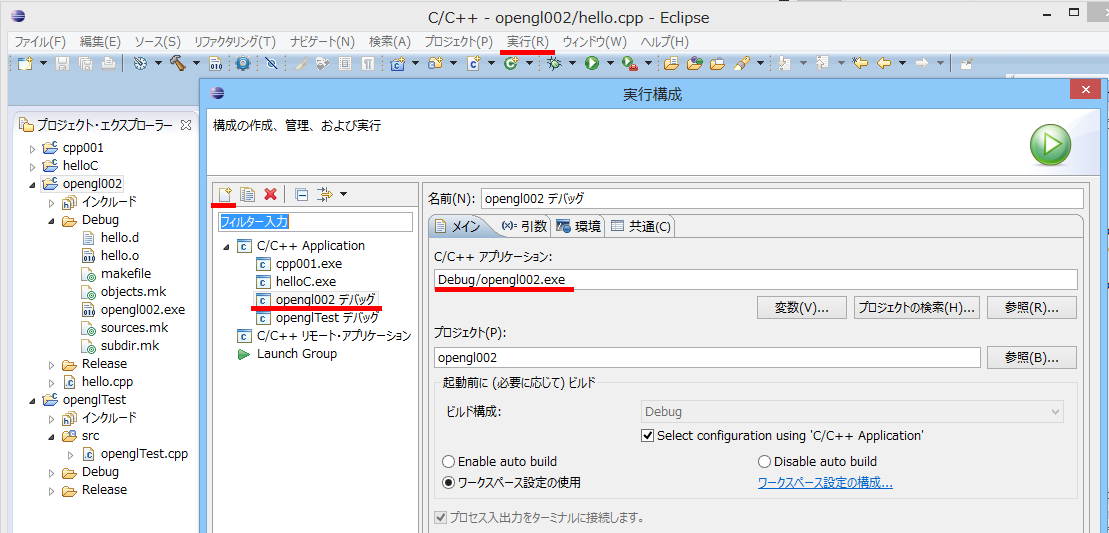
最初に実行する時は、実行の構成を設定する。

eclipse から実行した場合、コマンドプロンプトは出ない。
freeglut-MinGW-2.8.1-1.mp.zipをダウンロードして解凍する。
freeglut フォルダの中の lib フォルダを、MinGW のlib フォルダにコピーする。
freeglut フォルダの中の include フォルダを、MinGW のinclude フォルダにコピーする。
freeglut フォルダの中の bin フォルダの中の freeglut.dll は、
パスが通っているフォルダにコピーすればいいので、MinGW のbin にコピーした。
freeglutのサイトでのコードを実行してみる。
http://www.transmissionzero.co.uk/computing/using-glut-with-mingw/
#include <stdlib.h>
#include <GL/glut.h>

void keyboard(unsigned char key, int x, int y);
void display(void);


int main(int argc, char** argv)
{
  glutInit(&argc, argv);
  glutCreateWindow("GLUT Test");
  glutKeyboardFunc(&keyboard);
  glutDisplayFunc(&display);
  glutMainLoop();

  return EXIT_SUCCESS;
}


void keyboard(unsigned char key, int x, int y)
{
  switch (key)
  {
    case '\x1B':
      exit(EXIT_SUCCESS);
      break;
  }
}


void display()
{
  glClear(GL_COLOR_BUFFER_BIT);

  glColor3f(1.0f, 0.0f, 0.0f);

  glBegin(GL_POLYGON);
    glVertex2f(-0.5f, -0.5f);
    glVertex2f( 0.5f, -0.5f);
    glVertex2f( 0.5f,  0.5f);
    glVertex2f(-0.5f,  0.5f);
  glEnd();

  glFlush();
}
D:\>g++ opencv.cpp -o opencv.exe -lfreeglut -lglu32 -lopengl32
opencv.exe が出来上がる。
ダブルクリックで実行してみる。

eclipse で開発したい。
すでに、MinGW が使えるのでスタンダードエディションを選ぶ。
日本語プロジェクトのPleiades 32bit C/C++ のpleiades-e4.3-cpp-32bit_20130626.zip
をダウンロードして解凍する。
空の C++ プロジェクトを ツールチェーンは MinGW を選択するして作成する。
ソースコードを追加して、上と同じコードを書き込む。
ビルドの設定をする。
リンカを設定する。
freeglut
glu32
opengl32
プロジェクトを右クリックして、構成のビルドから、すべてのビルビルドを選択する。
Debug フォルダが出来て、その中に、プロジェクト名.exe が出来る。
最初に実行する時は、実行の構成を設定する。
eclipse から実行した場合、コマンドプロンプトは出ない。
2013年12月8日日曜日
cocos2d-x を使ってみる
クロスプラットホームの開発が出来るという事で、cocos2d-x を使ってみたいと思います。
cocos2d-x-2.2.1.zip をダウンロードして解凍
Windowsアプリを作ってみたいと思います。
Visual Studio 用のプロジェクトを作るために、
{cocos2d-xのインストールディレクトリ}\tools\project-creator\create_project.py
を実行する必要があるので、Python をインストールする。
左下の数字を非表示にするには、
classes フォルダの AppDelegate.cpp を開いて、
// turn on display FPS
pDirector->setDisplayStats(false);
背景やボタンは、classes フォルダの HelloWorldScene.cpp で指定。
cocos2d-x-2.2.1.zip をダウンロードして解凍
Windowsアプリを作ってみたいと思います。
Visual Studio 用のプロジェクトを作るために、
{cocos2d-xのインストールディレクトリ}\tools\project-creator\create_project.py
を実行する必要があるので、Python をインストールする。
python-2.7.6.amd64.msi をダウンロードして実行する。
を実行する。
python-3は使えない。
>{pythonのインストールディレクトリ}\python create_project.py -project ProjectName -package com.jp.packagename -language cpp
を実行する。
{cocos2d-xのインストールディレクトリ}\projects
にプロジェクトが作成される。
プロジェクトをVisual Studio で読み込んで実行する。


左下の数字を非表示にするには、
classes フォルダの AppDelegate.cpp を開いて、
// turn on display FPS
pDirector->setDisplayStats(false);
背景やボタンは、classes フォルダの HelloWorldScene.cpp で指定。
2013年12月6日金曜日
MinGW のインストール
gtkmm-win32-devel-2.10.8-1.exe をダウンロードしてインストール
パスを設定する
D:\MinGW\bin
D:\MinGW\msys\1.0\bin
確認する
>gcc -v
バージョンが表示されれば成功
hello.c
>gcc hello.c
a.exe が出来上がる。
コマンドプロンプトから実行できる。
Makefile を作る。
>make
hello.exe が出来る。
パスを設定する
D:\MinGW\bin
D:\MinGW\msys\1.0\bin
確認する
>gcc -v
バージョンが表示されれば成功
hello.c
#include <stdio.h>

int main(void)
{
    printf("Hello world!\n");

    return 0;
}
>gcc hello.c
a.exe が出来上がる。
コマンドプロンプトから実行できる。
Makefile を作る。
SRC=hello.c
OBJS=$(SRC:.c=.o)
PROG=hello.exe
CC=gcc
CFLAGS=-Wall -O3
#LDFLAGS=-mwindows
RM=rm


%.o: %.c
 $(CC) $(CFLAGS) -o $@ -c $<

.PHONY : all
all: $(PROG)

$(PROG): $(OBJS)
 $(CC) $(OBJS) $(LDFLAGS) -o $@

.PHONY : clean
clean:
 $(RM) $(OBJS)
>make
hello.exe が出来る。
GTK+ インストールメモ
gtk+-bundle_3.6.4-20130921_win32.zip をダウンロードして解凍
解凍して出来たフォルダの名前をを、gtk に変更。
D:\MinGW\msys\1.0\home\yamato\hellogtk\gtk に移動
hellogtk.c
Makefile

出来上がったexeファイルをダブルクリックで起動させる為に必要なdllファイル
libatk-1.0-0.dll
libcairo-2.dll
libcairo-gobject-2.dll
libffi-6.dll
libfontconfig-1.dll
libfreetype-6.dll
libgdk-3-0.dll
libgdk_pixbuf-2.0-0.dll
libgio-2.0-0.dll
libglib-2.0-0.dll
libgmodule-2.0-0.dll
libgobject-2.0-0.dll
libgtk-3-0.dll
libiconv-2.dll
libintl-8.dll
liblzma-5.dll
libpango-1.0-0.dll
libpangocairo-1.0-0.dll
libpangoft2-1.0-0.dll
libpangowin32-1.0-0.dll
libpixman-1-0.dll
libpng15-15.dll
libxml2-2.dll
pthreadGC2.dll
zlib1.dll
解凍して出来たフォルダの名前をを、gtk に変更。
D:\MinGW\msys\1.0\home\yamato\hellogtk\gtk に移動
hellogtk.c
#include <gtk/gtk.h>

static void destroy(GtkWidget *widget, gpointer data)
{
    gtk_main_quit();
}

int main(int argc, char **argv)
{
    GtkWidget *window;
    GtkWidget *label;

    gtk_init(&argc, &argv);

    window = gtk_window_new(GTK_WINDOW_TOPLEVEL);
    label = gtk_label_new("Hello, world!");
    gtk_container_add(GTK_CONTAINER(window), label);
    gtk_widget_show(label);
    gtk_widget_show(window);

    g_signal_connect(G_OBJECT(window), "destroy", G_CALLBACK(destroy), NULL);
    gtk_main();

    return 0;
}
Makefile
CC=gcc
PKG_CONFIG = ./gtk/bin/pkg-config

CFLAGS = -Wall -DGTK_DISABLE_DEPRECATED `$(PKG_CONFIG) --cflags gtk+-3.0`
LDFLAGS = `$(PKG_CONFIG) --libs gtk+-3.0`

hellogtk.exe: hellogtk.o
 $(CC) -o hellogtk.exe hellogtk.o $(LDFLAGS)

hellogtk.o: hellogtk.c
 $(CC) $(CFLAGS) -c -o hellogtk.o hellogtk.c
コマンドプロンプトから実行

出来上がったexeファイルをダブルクリックで起動させる為に必要なdllファイル
libatk-1.0-0.dll
libcairo-2.dll
libcairo-gobject-2.dll
libffi-6.dll
libfontconfig-1.dll
libfreetype-6.dll
libgdk-3-0.dll
libgdk_pixbuf-2.0-0.dll
libgio-2.0-0.dll
libglib-2.0-0.dll
libgmodule-2.0-0.dll
libgobject-2.0-0.dll
libgtk-3-0.dll
libiconv-2.dll
libintl-8.dll
liblzma-5.dll
libpango-1.0-0.dll
libpangocairo-1.0-0.dll
libpangoft2-1.0-0.dll
libpangowin32-1.0-0.dll
libpixman-1-0.dll
libpng15-15.dll
libxml2-2.dll
pthreadGC2.dll
zlib1.dll
2013年12月5日木曜日
QwtPlot::setPlotLayout(..)
とりあえず使い方


#include "main.h"

#include <qwt_plot_curve.h>
#include <qwt_symbol.h>
#include <qwt_plot_layout.h>
#include <qwt_plot.h>

int main(int argc, char *argv[])
{
    QApplication a(argc, argv);
    //MainWindow w;
    //w.show();

    QwtPlot *plot = new QwtPlot;
    plot->setTitle("Title");                //グラフのタイトル
    plot->setFooter("Footer");
    plot->setCanvasBackground(QBrush(Qt::white));//キャンバスの背景 青

    plot->setAxisTitle(0,"[kw]");       // y軸のタイトル
    plot->setAxisTitle(2,"Time [Sec]");

    plot->setAxisScale( QwtPlot::yLeft, 0.0, 10.0 );
    plot->setAxisScale( QwtPlot::xBottom, 0.0, 5.0 );

    QwtPlotCurve *curve = new QwtPlotCurve();
    curve->setTitle( "Some Points" );
    curve->setPen( Qt::blue, 4 ),
            curve->setRenderHint( QwtPlotItem::RenderAntialiased, true );

    QwtSymbol *symbol = new QwtSymbol( QwtSymbol::Ellipse,
        QBrush( Qt::yellow ), QPen( Qt::red, 2 ), QSize( 8, 8 ) );
    curve->setSymbol( symbol );

    QPolygonF points;
    points << QPointF( 0.0, 4.4 ) << QPointF( 1.0, 3.0 )
           << QPointF( 2.0, 4.5 ) << QPointF( 3.0, 6.8 )
           << QPointF( 4.0, 7.9 ) << QPointF( 5.0, 7.1 );
    curve->setSamples( points );
    curve->attach( plot );

    QwtPlotLayout *qwtLayout = plot->plotLayout();
    qwtLayout->setCanvasMargin(100,QwtPlot::yLeft);

    //plot->setPlotLayout(qwtLayout);

    //plot->replot();

    plot->resize( 600, 400 );
    plot->show();
    return a.exec();
}


void MyMain::setValueToTheLabel(double value)
{
    qDebug() << QString::number( value );
}
Qwtのインストール・メモ Ubuntu 版
Ubuntu 13.04
64bit qwt-6.1.0.tar.bz2 をダウンロードして解凍
Qt をインストールしたディレクトリのbinフォルダのqmakeを使う
>qmake qwt.pro -o Makefile
>make -f Makefile
>sudo make install とりあえず、/usr/local/qwt-6.1.0 ができた。
64bit qwt-6.1.0.tar.bz2 をダウンロードして解凍
Qt をインストールしたディレクトリのbinフォルダのqmakeを使う
>qmake qwt.pro -o Makefile
>make -f Makefile
>sudo make install とりあえず、/usr/local/qwt-6.1.0 ができた。
2013年12月4日水曜日
Qwt のスライダーを使ってみる
Qtのスライダーもあるけど、
Qwt で用意してあるスライダーを使ってみる。
とりあえず、表示してみる。

キャンバスの中にスライダーを表示してみる。
キャンバスはプロットエリアか?

スライダーをキャンバスの下に置きたいので、レイアウトを考えてみる。

やっぱりキャンバスの中で無い方がいいのかな?
スライダーの位置を取得してみる。
main.h
main.cpp

QwtSlider の目盛表示

スライダーと目盛幅

https://github.com/yamato8/QwtQwtSliderTest.git
スライダーの目盛の始点と終点の指定
slider->setScale(0,150);
スライダーの位置を取得
slider->value();
Qwt で用意してあるスライダーを使ってみる。
とりあえず、表示してみる。
#include "mainwindow.h"
#include <QApplication>

#include <qwt_plot.h>
#include <qwt_slider.h>

int main(int argc, char *argv[])
{
    QApplication a(argc, argv);
    //MainWindow w;
    //w.show();

    QwtPlot *plot = new QwtPlot;

    // スライダー関係
    QwtSlider *slider = new QwtSlider(plot);
    slider->setOrientation(Qt::Horizontal);//横位置のスライダー


    plot->resize( 600, 400 );
    plot->show();
    return a.exec();
}
表示だけは、さすがに簡単でした。キャンバスの中にスライダーを表示してみる。
キャンバスはプロットエリアか?

#include "mainwindow.h"
#include <QApplication>

#include <qwt_plot.h>
#include <qwt_slider.h>

int main(int argc, char *argv[])
{
    QApplication a(argc, argv);
    //MainWindow w;
    //w.show();

    QwtPlot *plot = new QwtPlot;

    //キャンバスを取得
    QWidget *myCanbas = plot->canvas();

    // スライダー関係
    QwtSlider *slider = new QwtSlider(myCanbas);
    slider->setOrientation(Qt::Horizontal);//横位置のスライダー

    plot->resize( 600, 400 );
    plot->show();
    return a.exec();
}
スライダーをキャンバスの下に置きたいので、レイアウトを考えてみる。

#include "mainwindow.h"
#include <QApplication>

#include <qwt_plot.h>
#include <qwt_slider.h>
#include <QBoxLayout>

int main(int argc, char *argv[])
{
    QApplication a(argc, argv);
    //MainWindow w;
    //w.show();

    QwtPlot *plot = new QwtPlot;

    //キャンバスを取得
    QWidget *myCanbas = plot->canvas();

    // スライダー関係
    QwtSlider *slider = new QwtSlider();
    slider->setOrientation(Qt::Horizontal);//横位置のスライダー

    // レイアウトを考える
    QVBoxLayout *layout = new QVBoxLayout;//レイアウトを設定 上から下
    layout->addStretch(1);//上に空白を開ける
    layout->addWidget(slider);//レイアウトにスライダーを入れる

    // キャンバスにレイアウトを設定
    myCanbas->setLayout(layout);

    plot->resize( 600, 400 );
    plot->show();
    return a.exec();
}
やっぱりキャンバスの中で無い方がいいのかな?
スライダーの位置を取得してみる。
main.h
#ifndef MAIN_H
#define MAIN_H

#include <QWidget>
#include <QApplication>

#include <qwt_plot.h>
#include <qwt_slider.h>
#include <QBoxLayout>

class MyMain : public QWidget
{
    Q_OBJECT

public:

    MyMain(QWidget *parent = 0): QWidget(parent)
    {
    }

public slots:
    void setValueToTheLabel(double value);

};

#endif // MAIN_H
main.cpp
#include "main.h"

int main(int argc, char *argv[])
{
    QApplication a(argc, argv);
    //MainWindow w;
    //w.show();

    QwtPlot *plot = new QwtPlot;

    //キャンバスを取得
    QWidget *myCanbas = plot->canvas();

    // スライダー関係
    QwtSlider *slider = new QwtSlider();
    slider->setOrientation(Qt::Horizontal);//横位置のスライダー
    MyMain *mySlot = new MyMain;
    QObject::connect( slider, SIGNAL(valueChanged(double)), mySlot, SLOT(setValueToTheLabel(double)) );

    // レイアウトを考える
    QVBoxLayout *layout = new QVBoxLayout;//レイアウトを設定 上から下
    layout->addStretch(1);//上に空白を開ける
    layout->addWidget(slider);//レイアウトにスライダーを入れる

    // キャンバスにレイアウトを設定
    myCanbas->setLayout(layout);

    plot->resize( 600, 400 );
    plot->show();
    return a.exec();
}


void MyMain::setValueToTheLabel(double value)
{
    qDebug() << QString::number( value );
}
スライダーを移動させるとQT Creatorのアプリケーション出力に値が表示される。
QwtSlider の目盛表示
スライダーと目盛幅
https://github.com/yamato8/QwtQwtSliderTest.git
スライダーの目盛の始点と終点の指定
slider->setScale(0,150);
スライダーの位置を取得
slider->value();
スライダーのステップ数
slider->setTotalSteps(200);2013年12月2日月曜日
ドックウィジェット

#include "mainwindow.h"
#include "ui_mainwindow.h"
#include <QPushButton>
#include <qtextedit.h>
#include <QDockWidget>
#include <QLabel>

MainWindow::MainWindow(QWidget *parent) :
    QMainWindow(parent),
    ui(new Ui::MainWindow)
{
    QMainWindow *window = new QMainWindow();
    window->setCentralWidget(new QTextEdit());//テキストエリア
    setCentralWidget(window);//ウインドウをセンターに設定

    QDockWidget *dwTop = new QDockWidget();//ドップダックウインドウに表示するドック生成
    QPushButton *buttonTop = new QPushButton("トップドックウインドウ");//ボタンを生成
    dwTop->setWidget(buttonTop);//ダックにボタン設定
    addDockWidget(Qt::TopDockWidgetArea, dwTop);//トップドックウインドウにドックを設定

    QDockWidget *dwButtom = new QDockWidget();
    QPushButton *buttonButtom = new QPushButton("ボトムドックウインドウ");
    dwButtom->setWidget(buttonButtom);
    addDockWidget(Qt::BottomDockWidgetArea, dwButtom);

    QDockWidget *dockMain = new QDockWidget();
    addDockWidget(Qt::LeftDockWidgetArea, dockMain);//左のドックを設定
    addDockWidget(Qt::RightDockWidgetArea, new QDockWidget());//右のドックを設定
    dockMain->setWidget(new QLabel("レフトダックエリア", dockMain));//左のドックにラベルを表示
}

MainWindow::~MainWindow()
{
    delete ui;
}
Qtのメニュー

#include "mainwindow.h"
#include "ui_mainwindow.h"

MainWindow::MainWindow(QWidget *parent) :
    QMainWindow(parent),
    ui(new Ui::MainWindow)
{
    ui->setupUi(this);

    QMenu *fileMenu = menuBar()->addMenu(tr("&File"));
    fileMenu->addAction(new QAction(tr("&New"), this));

    QMenu *edit = menuBar()->addMenu(tr("&Edit"));
}

MainWindow::~MainWindow()
{
    delete ui;
}
デザイン画面では、メニューバーのタイトル部分は日本語の入力が出来るが
項目の部分では日本語入ちょくが使えないので、コピー・ペーストで貼り付けるか、
ソースコードから追加する。


レイアウトを設定

#include "mainwindow.h"
#include "ui_mainwindow.h"

#include <QPushButton>
#include <QBoxLayout>
#include <QLabel>

MainWindow::MainWindow(QWidget *parent) :
    QMainWindow(parent),
    ui(new Ui::MainWindow)
{
    QWidget *myQWidget = new QWidget();
    setCentralWidget(myQWidget);//myQWidgetをメインウィンドウのセントラルウィジットに設定

    QPushButton *button1 = new QPushButton("ボタン1");//ボタンを生成
    QPushButton *button2 = new QPushButton("ボタン2");//ボタンを生成

    QVBoxLayout *layout = new QVBoxLayout;//レイアウトを設定 上から下

    layout->addWidget(button1);//レイアウトにボタンを設定
    layout->addWidget(button2);

    myQWidget->setLayout(layout);//ウインドウにレイアウトを設定
}

MainWindow::~MainWindow()
{
    delete ui;
}

#include "mainwindow.h"
#include "ui_mainwindow.h"
#include <QHBoxLayout>
#include <QVBoxLayout>
#include <QPushButton>

MainWindow::MainWindow(QWidget *parent) :
    QMainWindow(parent),
    ui(new Ui::MainWindow)
{
    QWidget *myQWidget = new QWidget();
    setCentralWidget(myQWidget);//myQWidgetをメインウィンドウのセントラルウィジットに設定

    QPushButton *button1 = new QPushButton("1");//ボタンを生成
    QPushButton *button2 = new QPushButton("2");//ボタンを生成
    QPushButton *button3 = new QPushButton("3");//ボタンを生成
    QPushButton *button4 = new QPushButton("4");//ボタンを生成
    QPushButton *button5 = new QPushButton("5");//ボタンを生成

    QHBoxLayout *hLayout = new QHBoxLayout;//レイアウトを設定 左から右
    hLayout->addWidget(button1);//レイアウトにボタンを設定
    hLayout->addWidget(button2);//レイアウトにボタンを設定
    hLayout->addWidget(button3);//レイアウトにボタンを設定

    QVBoxLayout* vLayout = new QVBoxLayout;//レイアウトを設定 上から下
    vLayout->addWidget(button4);//レイアウトにボタンを設定
    vLayout->addWidget(button5);//レイアウトにボタンを設定

    QVBoxLayout* topLayout = new QVBoxLayout;
    topLayout->addLayout(hLayout);
    topLayout->addLayout(vLayout);

    myQWidget->setLayout(topLayout);//ウインドウにレイアウトを設定
}

MainWindow::~MainWindow()
{
    delete ui;
}
参考サイト:http://qt-project.org/doc/qt-5.0/qtwidgets/mainwindow.html
2013年11月29日金曜日
qwtテンプレート
Qt GUI アプリケーションでプロジェクトを開く
qwtTest002.pro
plot.h
plot.cpp

examples フォルダにある。simpleplot を参考に書いてみる。
plot.cpp

qwtTest002.pro
#-------------------------------------------------
#
# Project created by QtCreator 2013-11-29T11:23:42
#
#-------------------------------------------------

QT       += core gui
CONFIG   += qwt

greaterThan(QT_MAJOR_VERSION, 4): QT += widgets

TARGET = qwtTest002
TEMPLATE = app


SOURCES += main.cpp\
        plot.cpp

HEADERS  += plot.h

FORMS    += plot.ui
plot.h
#ifndef PLOT_H
#define PLOT_H

#include <QMainWindow>
#include <qwt_plot.h>

namespace Ui {
class Plot;
}

class Plot : public QwtPlot
{
    Q_OBJECT

public:
    explicit Plot(QWidget *parent = 0);
    ~Plot();

private:
    Ui::Plot *ui;
};

#endif // PLOT_H
main.cpp#include "plot.h"
#include <QApplication>
int main(int argc, char *argv[])
{
QApplication a(argc, argv);
Plot w;
w.show();
return a.exec();
}
plot.cpp
#include "plot.h"
#include "ui_plot.h"

Plot::Plot(QWidget *parent) :
    QwtPlot(parent)
{
    setTitle( "Plot Demo" );//グラフのタイトル

}

Plot::~Plot()
{
    //ウインドウ終了
}
examples フォルダにある。simpleplot を参考に書いてみる。
plot.cpp
#include "plot.h"
#include "ui_plot.h"
#include <qwt_plot.h>
#include <qwt_plot_curve.h>
#include <qwt_plot_grid.h>
#include <qwt_symbol.h>
#include <qwt_legend.h>

Plot::Plot(QWidget *parent) :
    QwtPlot(parent)
{
    setTitle( "Plot Demo" );//グラフのタイトル
    setCanvasBackground( Qt::white );
    setAxisScale( QwtPlot::yLeft, 0.0, 10.0 );
    insertLegend( new QwtLegend() );

    QwtPlotGrid *grid = new QwtPlotGrid();
    grid->attach( this );

    QwtPlotCurve *curve = new QwtPlotCurve();
    curve->setTitle( "Some Points" );
    curve->setPen( Qt::blue, 4 ),
            curve->setRenderHint( QwtPlotItem::RenderAntialiased, true );

    QwtSymbol *symbol = new QwtSymbol( QwtSymbol::Ellipse,
    QBrush( Qt::yellow ), QPen( Qt::red, 2 ), QSize( 8, 8 ) );
    curve->setSymbol( symbol );

    QPolygonF points;
    points << QPointF( 0.0, 4.4 ) << QPointF( 1.0, 3.0 )
           << QPointF( 2.0, 4.5 ) << QPointF( 3.0, 6.8 )
           << QPointF( 4.0, 7.9 ) << QPointF( 5.0, 7.1 );
    curve->setSamples( points );

    curve->attach( this );

    resize( 600, 400 );

}

Plot::~Plot()
{
    //ウインドウ終了
}

2013年11月28日木曜日
データの追記
タイマーを使って擬似的にリアルタイムなグラフの作成に挑戦

サインカーブでやってみる。

x軸の移動を考えてみる
もっと便利な方法があるかもしれません。
#include "mainwindow.h"
#include "ui_mainwindow.h"
#include <QTimer>

QVector<double> xval;//空のベクタ宣言
QVector<double> yval;//空のベクタ宣言
double xyData = 1;

MainWindow::MainWindow(QWidget *parent) :
    QwtPlot(parent),
    ui(new Ui::MainWindow)
{
    //ui->setupUi(this);

    xval.append(0);
    xval.append(1);

    yval.append(0);
    yval.append(1);

    setTitle( "Plot Demo" );//グラフのタイトル
    setTitle("first_plot");
    setAxisTitle(QwtPlot::xBottom, " time [Second]");
    setAxisScale(QwtPlot::xBottom, 0,100 );
    setAxisTitle(QwtPlot::yLeft, "Value");
    setAxisScale(QwtPlot::yLeft, 0,100 );
    setAutoReplot(true);  // データの追記で必要

    curve = new QwtPlotCurve();
    curve->setPen(QPen(Qt::blue));
    curve->setSamples(xval.data(),yval.data(),xval.count());
    curve->attach(this);

    resize( 600, 400 );

    // タイマー
    QTimer *timer = new QTimer(this);
    connect(timer, SIGNAL(timeout()), this, SLOT(update()));
    timer->start(1000);
}

MainWindow::~MainWindow()
{
    delete ui;
}

void MainWindow::update()
{
    qDebug() << "hello" << xyData;

    xyData += 1;

    xval.append(xyData);
    yval.append(xyData);

    curve->setSamples(xval.data(), yval.data(), xyData+1 );
}

サインカーブでやってみる。
#include "mainwindow.h"
#include "ui_mainwindow.h"
#include <QTimer>

QVector<double> xval;//空のベクタ宣言
QVector<double> yval;//空のベクタ宣言

int kArraySize = 1000;
//double x[kArraySize] = {}; // x
//double y[kArraySize] = {}; // y
double xData = 0;

MainWindow::MainWindow(QWidget *parent) :
    QwtPlot(parent),
    ui(new Ui::MainWindow)
{
    //ui->setupUi(this);

    setTitle( "Plot Demo" );//グラフのタイトル
    setTitle("first_plot");
    setAxisTitle(QwtPlot::xBottom, " time [Second]");
    setAxisScale(QwtPlot::xBottom, 0,1 );
    setAxisTitle(QwtPlot::yLeft, "Value");
    setAxisScale(QwtPlot::yLeft, -1,1 );
    setAutoReplot(true);  // データの追記で必要

    curve = new QwtPlotCurve();
    curve->setPen(QPen(Qt::blue));
    //curve->setSamples(xval.data(),yval.data(),xval.count());
    curve->attach(this);

    resize( 600, 400 );

    // タイマー
    timer = new QTimer(this);
    connect(timer, SIGNAL(timeout()), this, SLOT(update()));
    timer->start(5);
}

MainWindow::~MainWindow()
{
    delete ui;
}

void MainWindow::update()
{
    qDebug() << "hello" << xData;

    if( xData < 1000 ){
        double x = xData/(1000-1.0);
        xval.append( x );
        yval.append( sin(2.0*M_PI*x) );

        curve->setSamples(xval.data(), yval.data(), xData);
        xData += 1;
    }else{
        timer->stop();
    }

}

x軸の移動を考えてみる
#include "mainwindow.h"
#include "ui_mainwindow.h"
#include <QTimer>
#include <qwt_plot_magnifier.h>

QVector<double> xval;//空のベクタ宣言
QVector<double> yval;//空のベクタ宣言

double xData = 0;

MainWindow::MainWindow(QWidget *parent) :
    QwtPlot(parent),
    ui(new Ui::MainWindow)
{
    //ui->setupUi(this);

    setTitle( "Plot Demo" );//グラフのタイトル
    setTitle("first_plot");
    setAxisTitle(QwtPlot::xBottom, " time [Second]");
    setAxisScale(QwtPlot::xBottom, 0,1 );   // x軸
    setAxisTitle(QwtPlot::yLeft, "Value");
    setAxisScale(QwtPlot::yLeft, -1,1 );
    setAutoReplot(true);  // データの追記で必要

    curve = new QwtPlotCurve();
    curve->setPen(QPen(Qt::blue));
    curve->attach(this);

    QwtPlotMagnifier* magnifier = new QwtPlotMagnifier( canvas());// 拡大縮小
    magnifier->setMouseButton(Qt::LeftButton);

    resize( 600, 400 );

    // タイマー
    timer = new QTimer(this);
    connect(timer, SIGNAL(timeout()), this, SLOT(update()));
    timer->start(30);
}

MainWindow::~MainWindow()
{
    delete ui;
}

void MainWindow::update()
{
        double x = xData/(100-1.0);
        xval.append( x );
        yval.append( sin(2.0*M_PI*x) );

        curve->setSamples(xval.data(), yval.data(), xval.count());

        // x軸を移動
        if( xval.last() > 1){
            setAxisScale(QwtPlot::xBottom,  xval.last()-1 ,xval.last() );
        }

        xData += 1;
}
もっと便利な方法があるかもしれません。
配列のデータでグラフを描く

#include "mainwindow.h"
#include "ui_mainwindow.h"

MainWindow::MainWindow(QWidget *parent) :
    QwtPlot(parent),
    ui(new Ui::MainWindow)
{
    //ui->setupUi(this);

    double xval[5]={10,20,30,40,50};
    double yval[5]={1,2.2,3,4,5};

    setTitle( "Plot Demo" );//グラフのタイトル
    setTitle("first_plot");
    setAxisTitle(QwtPlot::xBottom, " System time [h:m:s]");
    setAxisScale(QwtPlot::xBottom, 0,60 );
    setAxisTitle(QwtPlot::yLeft, "Degree");
    setAxisScale(QwtPlot::yLeft, -60,60 );

    curve = new QwtPlotCurve();
    curve->setPen(QPen(Qt::blue));
    curve->setSamples(xval,yval,5);
    curve->attach(this);

    resize( 600, 400 );
}

MainWindow::~MainWindow()
{
    delete ui;
}
グラフの拡大・縮小
#include <qapplication.h>
#include <qwt_plot.h>
#include <qwt_plot_curve.h>
#include <qwt_plot_grid.h>
#include <qwt_symbol.h>
#include <qwt_legend.h>
#include <qwt_plot_magnifier.h>

int main(int argc, char *argv[])
{
    QApplication a( argc, argv );

       QwtPlot plot;
       plot.setTitle( "Plot Demo" );
       plot.setCanvasBackground( Qt::white );
       plot.setAxisScale( QwtPlot::yLeft, 0.0, 10.0 );
       plot.insertLegend( new QwtLegend() );

       QwtPlotGrid *grid = new QwtPlotGrid();
       grid->attach( &plot );

       QwtPlotCurve *curve = new QwtPlotCurve();
       curve->setTitle( "Some Points" );
       curve->setPen( Qt::blue, 4 ),
       curve->setRenderHint( QwtPlotItem::RenderAntialiased, true );

       QwtSymbol *symbol = new QwtSymbol( QwtSymbol::Ellipse,
           QBrush( Qt::yellow ), QPen( Qt::red, 2 ), QSize( 8, 8 ) );
       curve->setSymbol( symbol );

       QPolygonF points;
       points << QPointF( 0.0, 4.4 ) << QPointF( 1.0, 3.0 )
           << QPointF( 2.0, 4.5 ) << QPointF( 3.0, 6.8 )
           << QPointF( 4.0, 7.9 ) << QPointF( 5.0, 7.1 );
       curve->setSamples( points );
       curve->attach( &plot );

       QwtPlotMagnifier* magnifier = new QwtPlotMagnifier( plot.canvas());
       magnifier->setMouseButton(Qt::LeftButton);

       plot.resize( 600, 400 );
       plot.show();

       return a.exec();
}

タイマーを使てみる
mainwindow.h
mainwindow.cpp
出力結果
hello
hello2
update
update
update
update
#ifndef MAINWINDOW_H
#define MAINWINDOW_H

#include <QMainWindow>
#include <iostream>

namespace Ui {
class MainWindow;
}

class MainWindow : public QMainWindow
{
    Q_OBJECT

public:
    explicit MainWindow(QWidget *parent = 0);
    ~MainWindow();

private:
    Ui::MainWindow *ui;

 public slots:
    void update();


};

#endif // MAINWINDOW_H
mainwindow.cpp
#include "mainwindow.h"
#include "ui_mainwindow.h"
#include <QtCore/QDebug>
#include <QTimer>

MainWindow::MainWindow(QWidget *parent) :
    QMainWindow(parent),
    ui(new Ui::MainWindow)
{
    ui->setupUi(this);

    qDebug() << "hello";
    QTimer *timer = new QTimer(this);
    connect(timer, SIGNAL(timeout()), this, SLOT(update()));
    timer->start(3000);

    qDebug() << "hello2";
}

MainWindow::~MainWindow()
{
    delete ui;
}

void MainWindow::update()
{
    qDebug() << "update";
}
出力結果
hello
hello2
update
update
update
update
登録:
投稿 (Atom)